Q1: camera and PC are connected in the same LAN ( Router), how to view the camera video?
Answered:
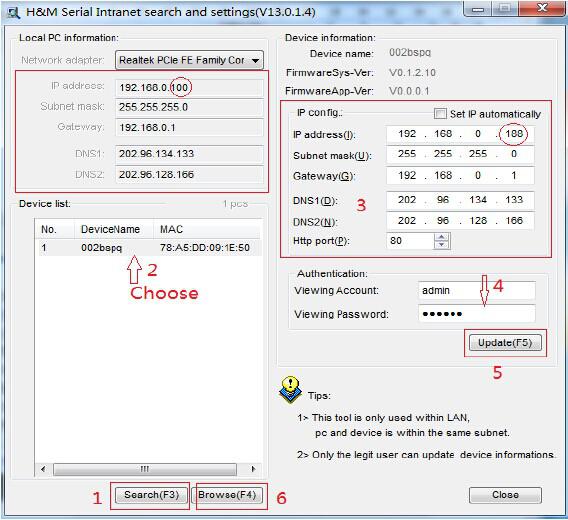
Step1: please click ‘search”, ( please make sure your firewall will not block up the camera tobe searched)
Step2: choose a camera that you search in LAN.
Step3: change IP Address of camera according to the local PC information on the left frame, especially, the numbers in red circle should be different, Http port should be 80~65535. (You can change port NO. according to your willing.)
Step4: input Viewing Account and Viewing Password for the camera (the default is “admin” and “123456”.)
Step5:click update(F5)
Step6: After Update successfully, click “search(F3)” ,Choose the device again and click “browse(F4) ”. Then you can run the browser, enter username and password (the default is admin and 123456), login IP Camera to view the video(normally the default browser on your PC will be ran)
Tips: You can hold on reset button on the camera for 10 seconds to restore factory default if you forget user name and password, or you are not sure about the device parameters.
Q2: My IP Address is right and IP address is without conflict with other device, when i open the camera web but without video?
Answered:
1.Please confirm whether you install OCX.exe.
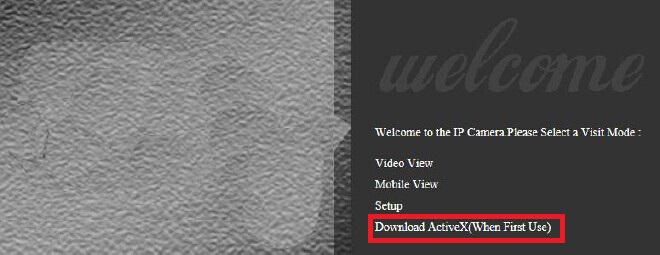
Remarks:
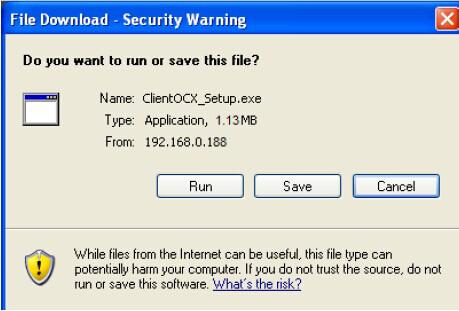
For first time, you need to download ActiveX, click “Download ActiveX”, it will pop up a prompt as below,click “Run”, it will download and install ActiveX automatically. Please refresh web after finishing installation.
2. Please confirm whether the browser you select is right. IP Camera support “IE browser, Chrome browser, Firefox browser and Safari browser”
Q3:The camera is connected to network, but why i can’t search the IP Camera by Search Tool ?
Answered:
1.Check whether the network cable is connected well or the power adapter is connected well.
2.Check the camera and PC are in the same LAN or in the same router.
3.Check the camera gateway is the same with PC gateway or not.
4.Check the firewall or Anti-virus software on PC block up the Search Tool. Advise to logout the firewall or Anti-virus software,then restart Search Tool to search device.
5.If the camera can’t be searched in Win7 or Win8, please reduce user authority, then restart Search Tool.
6.Check whether the camera IP Address is conflict with other devices’ IP address, such as PC,printer.
Q4:When i click “browse” in LAN search tool, nothing happened, why?
Answered:
Reset default browser in “Internet Option”, or change other browser as default browser, it is caused by broken browser.
Q5:How to use WiFi ?
Answered:
1.there are 2 manners for setting WiFi, one manner is setting WiFi on web. The other manner is setting WiFi on Android/iOS.
2.Now show you how to set WiFi on web ( such as 610 and 615 model) .
Step1:login camera on web by LAN Search Tool,
Step2: click “setup”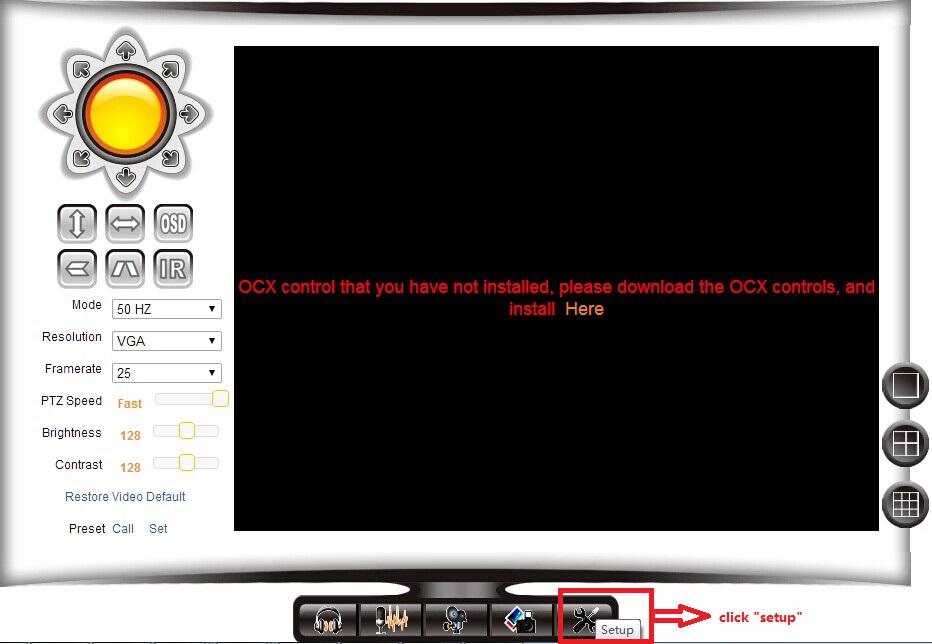
Step3:after click “setup”, you will see below picture:
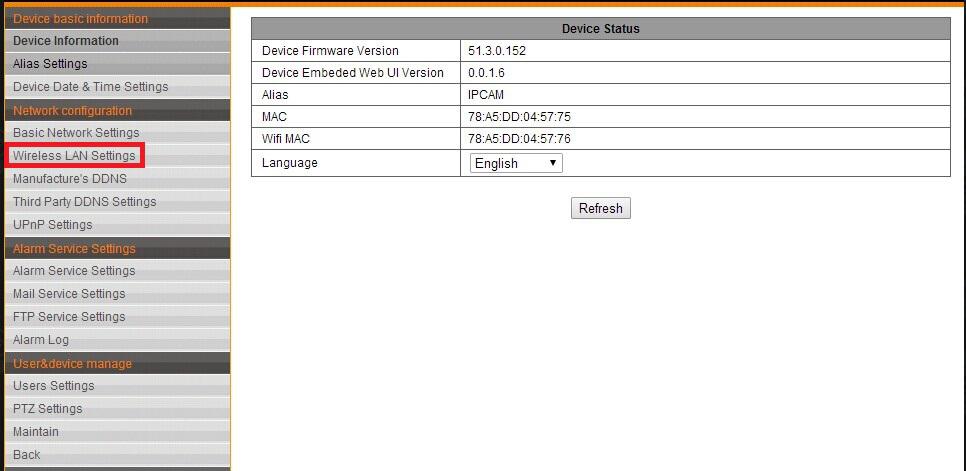
Step4:click “wireless LAN Settings”
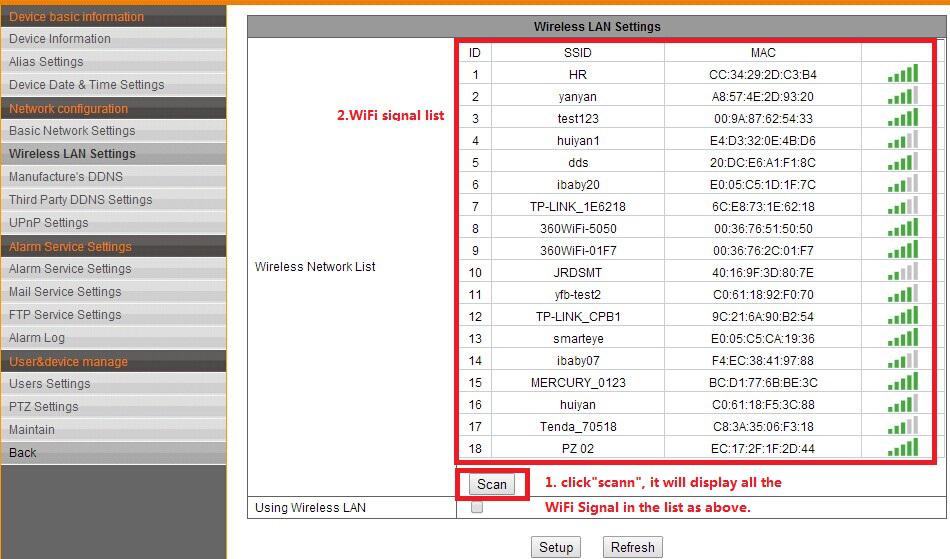
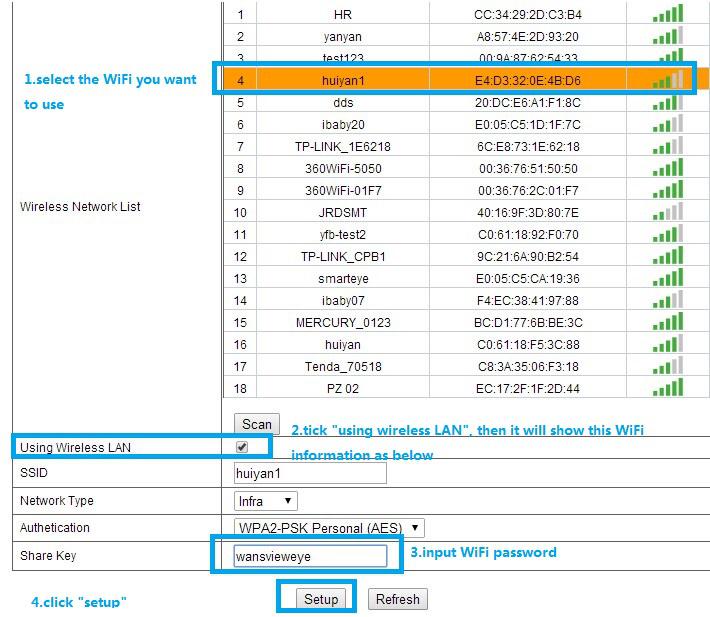
Step5: select one WiFi signal you want to use, such as “huiyan1”, then tick “Using Wireless LAN”, then it will show this WiFi ”huiyan1” information as below.input password,click “setup” at last. The picture as below.
Step6: Unplug the cable, then you can connect to router by wifi.
Notice: When the device is connected both WIFI and wired, it will firstly connect to the wired network. If the camera enables DHCP to obtain IP address automatically, so the IP address is not same in wired connection and wifi connection, recommend to set fixed IP address for the camera.
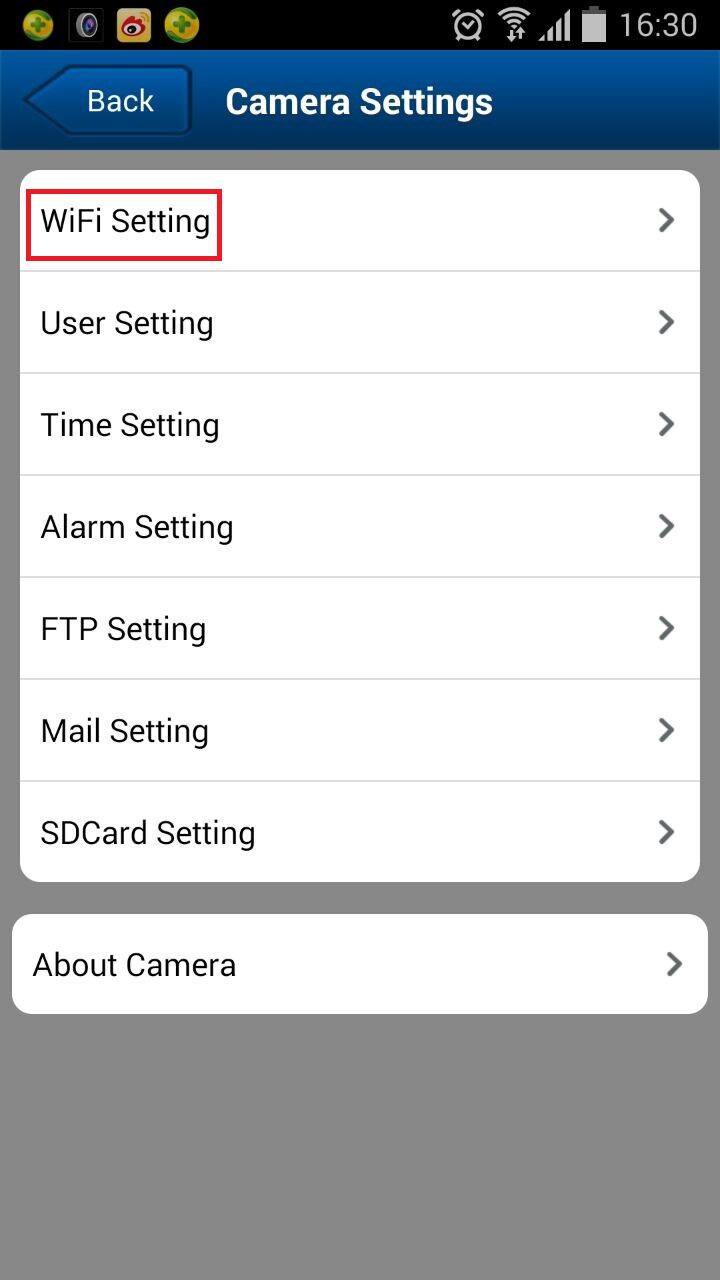
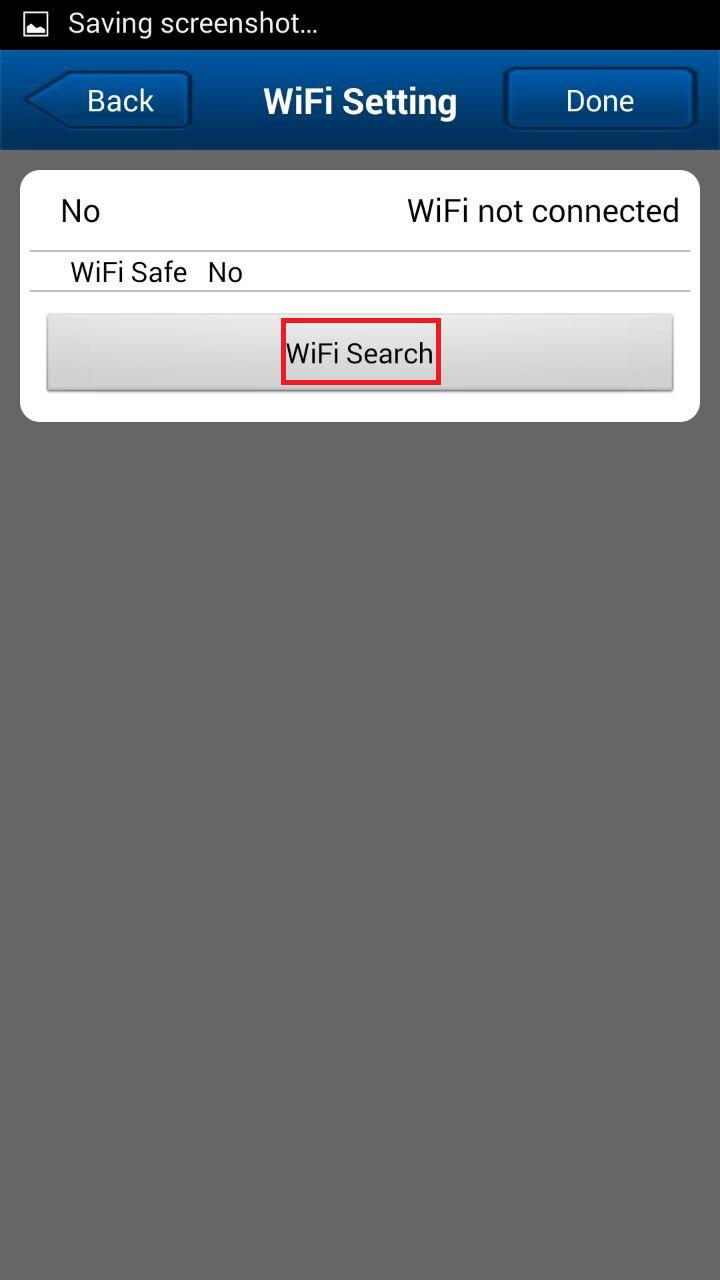
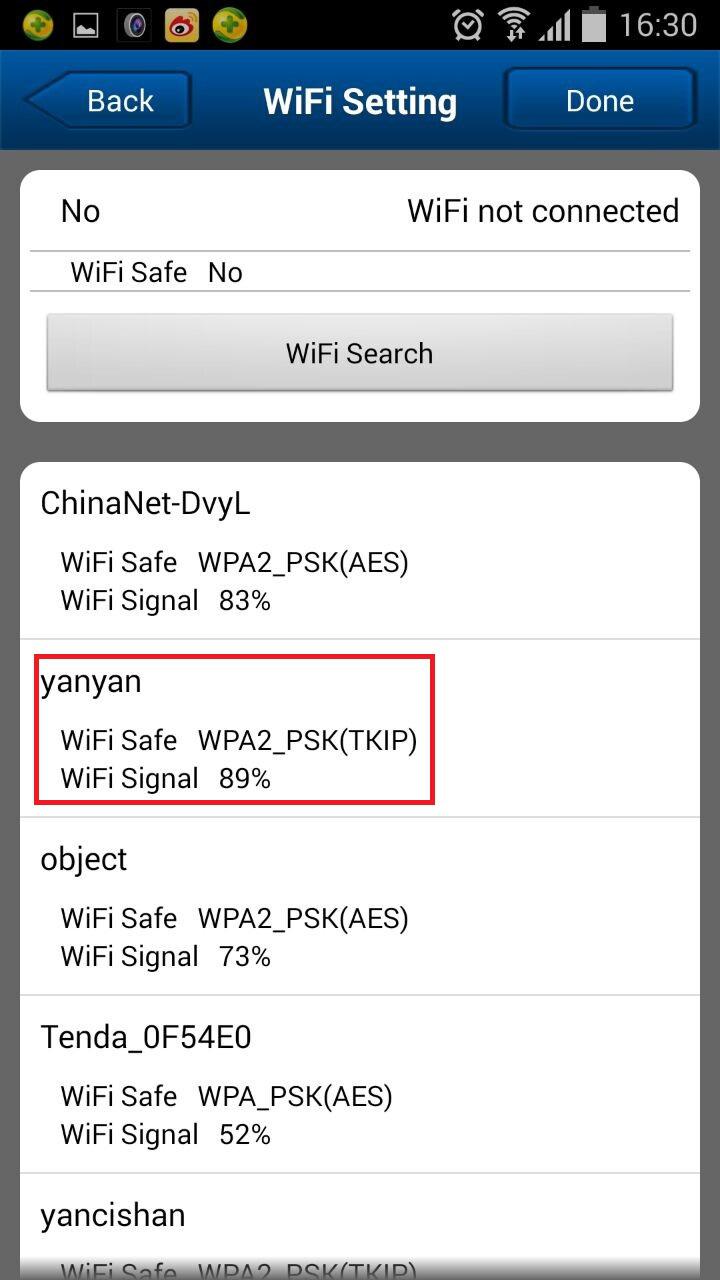
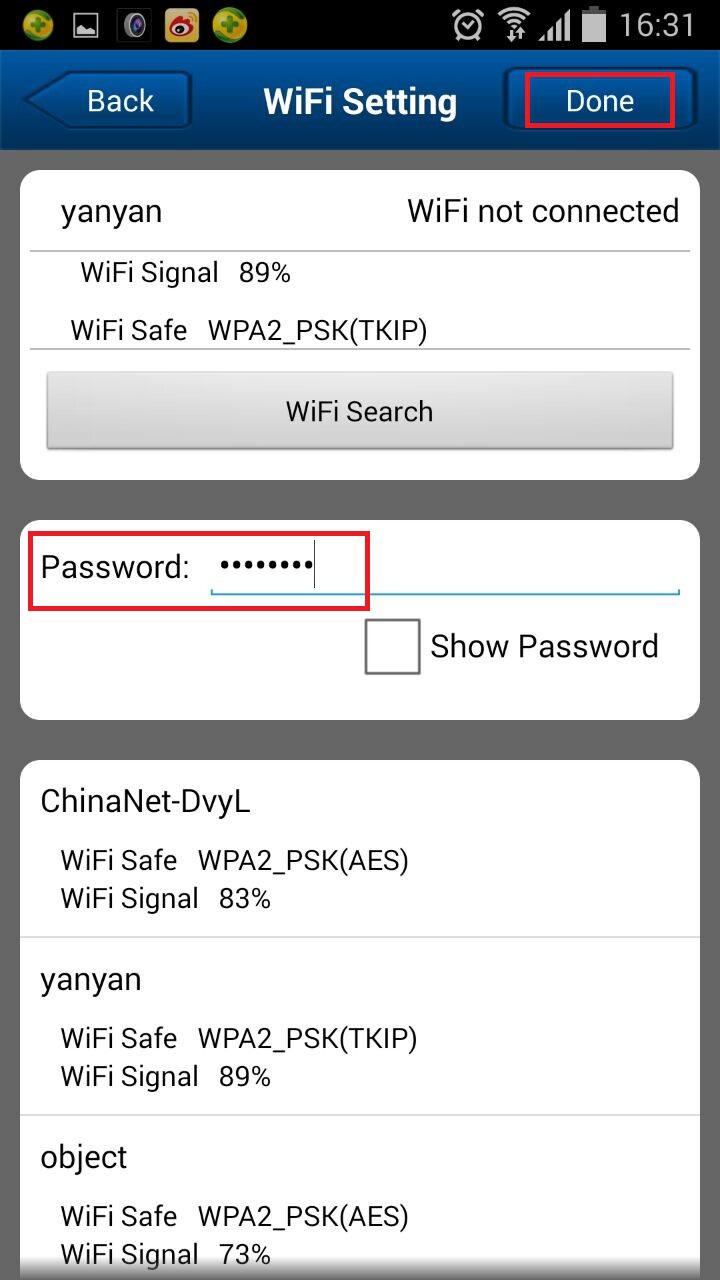
3.setup WiFi on Android/iOS.
Step1:enter into “advanced setting”,
Step2:then click”WiFi setting”,and search WiFi,
Step3:then select one WiFi signal you want to use, and input WiFi password, at last click”Done”
The pictures as below:
Q6: How to check SD Card content?
Answered:
Step1: Search camera by LAN Search Tool, then Login camera on browser. You will enter into this interface as below: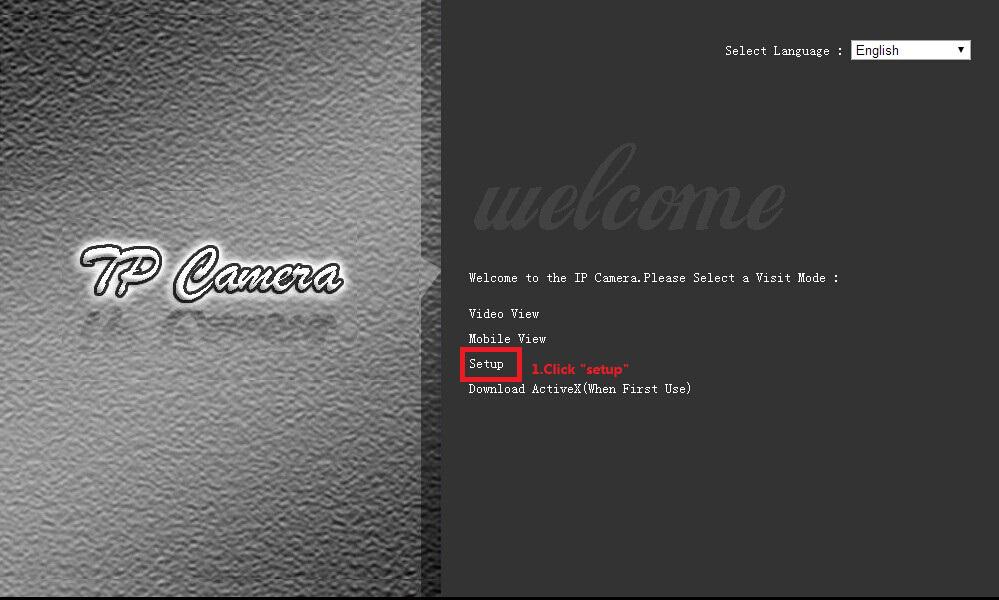
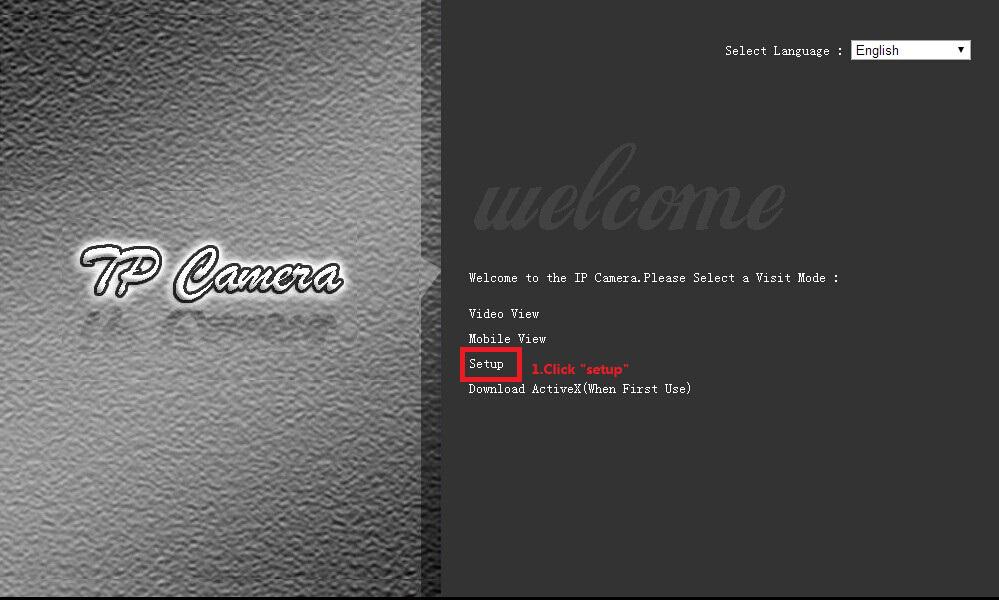
Step2: click “Setup”, you will enter into this below page, then click “view the content of TF/SD Card”
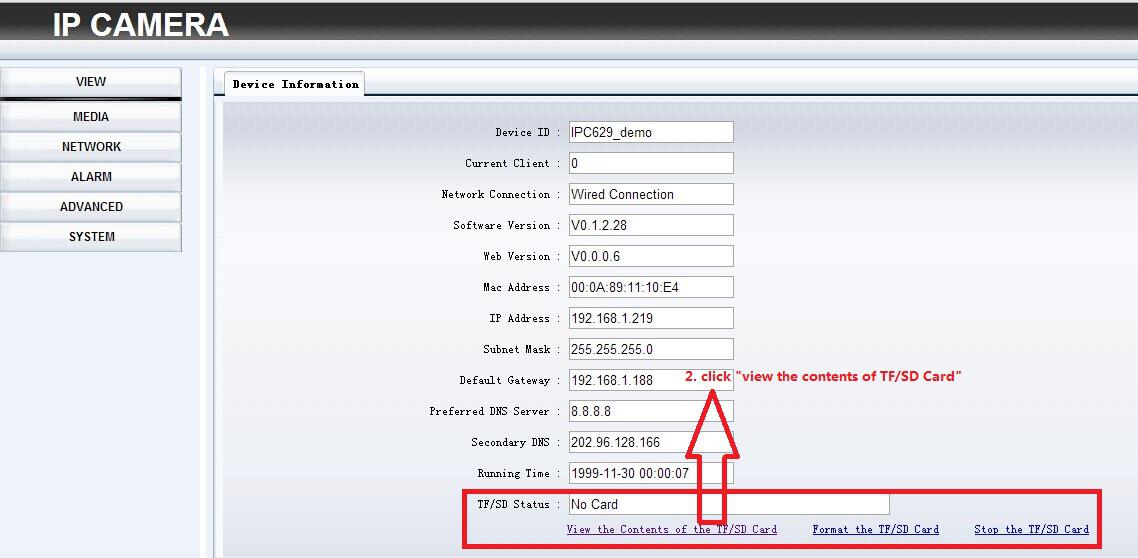
Q7:There is SD Card in camera, but when i check SD Card, there is nothing in SD Card, why?
Answered:
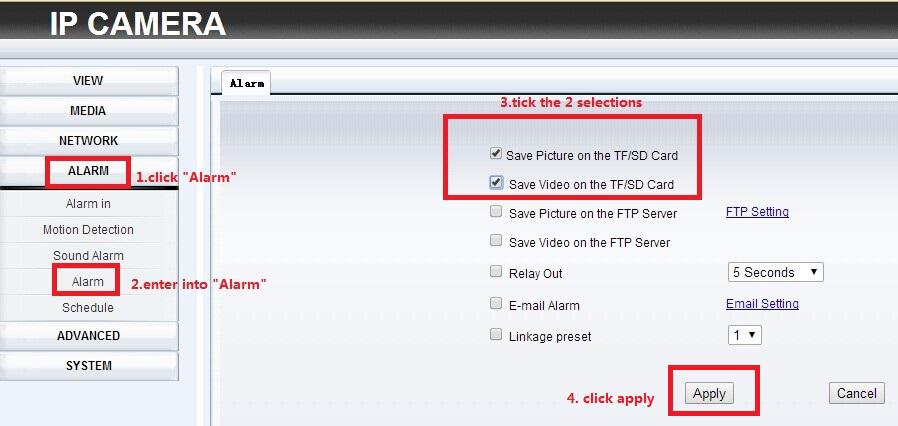
It must be that you don’t set SD Card to make it save video or pictures in SD Card.
Now i will tell you how to set SD Card.
Normally, SD Card can save Alarm files and Schedule Record files. You can set SD Card function on web or on Android/iOS.
Manner 1: set SD Card function on WEB.
1.How to set “save Alarm files ”
Answered: enter into “Setup”→“Alarm Setting” on web.
2.how to set “save schedule recording file to SD Card” ?
Answered:
enter into “Setup”→“Advanced” on web.
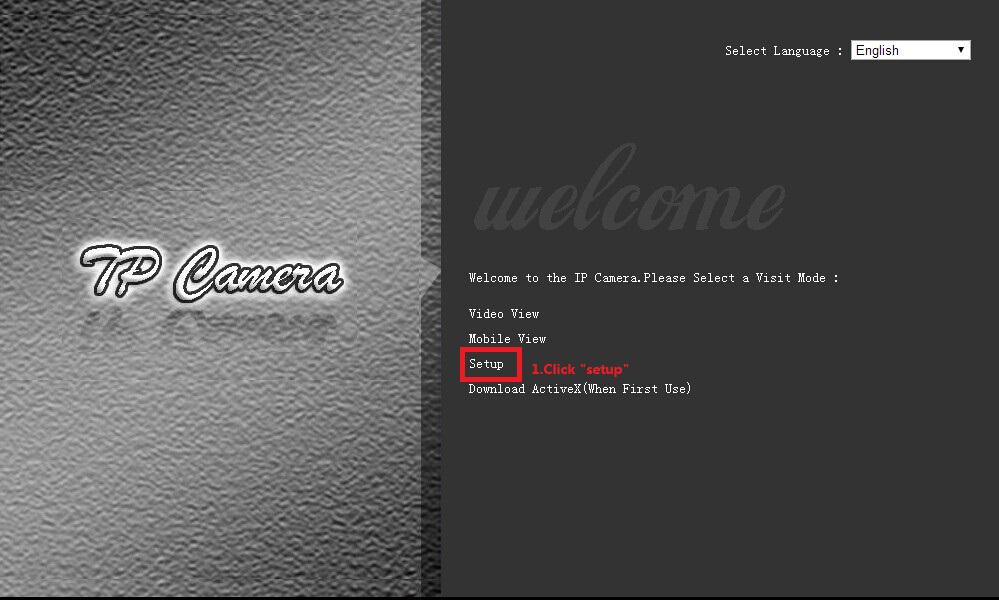
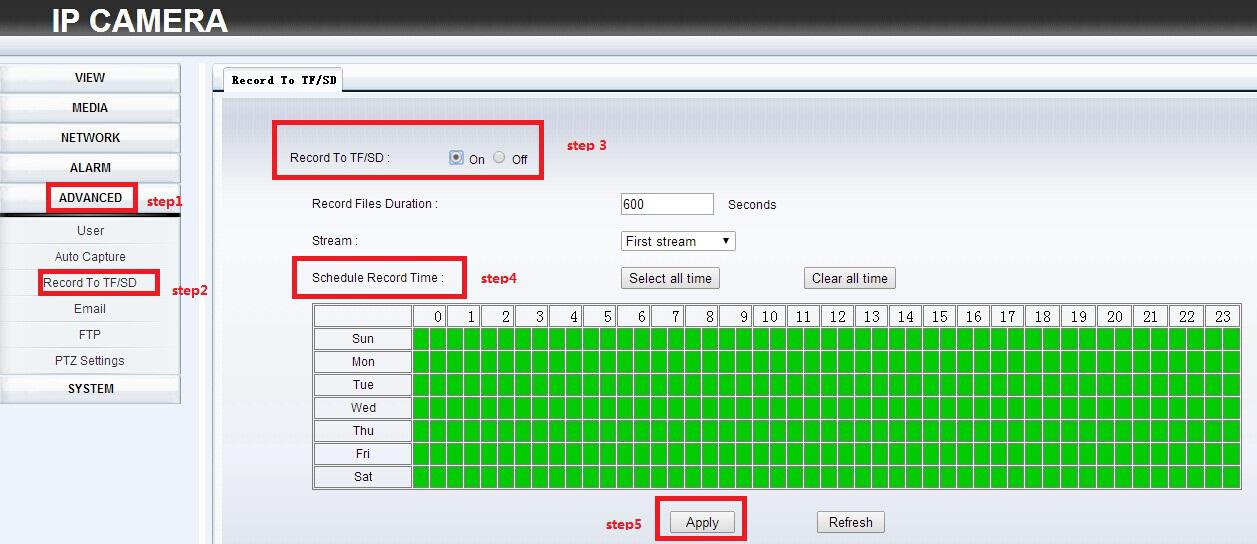
Manner 2: set SD Card function on iOS/Android
1.About setting “save Alarm files to SD Card” , you can enter into “Advanced settings”→Alarm Settings
2.About setting “save schedule files to SD Card” , You can enter into “Advanced settings”→SD Settings
Q8: How to view on PC client software?
Answered: there are 2 manners to add camera, one is adding camera manually;the other manner is to add camera by searching in LAN.Now show you how to add camera by searching.
Step1: click “add device ” button as below

Step2: select “search to add”
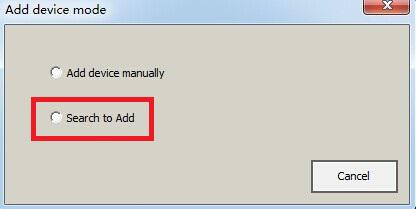
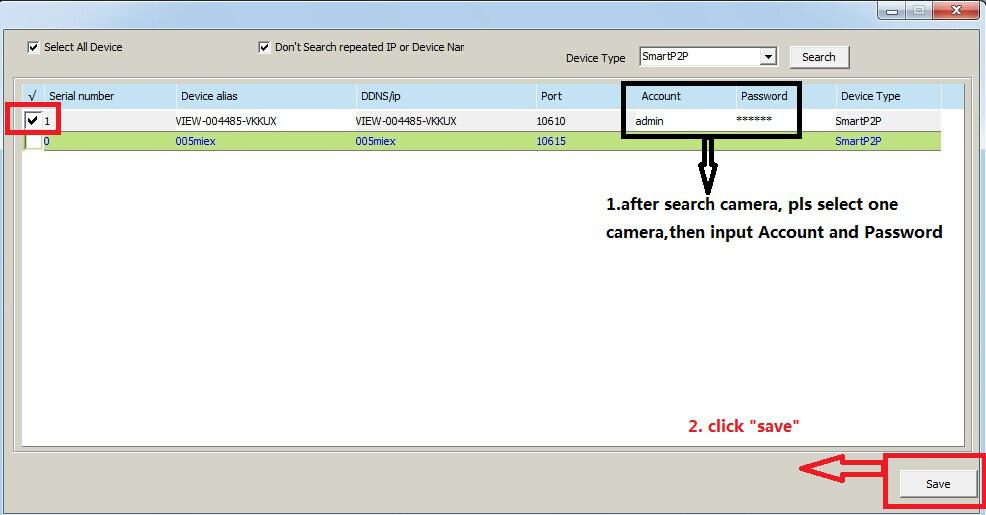
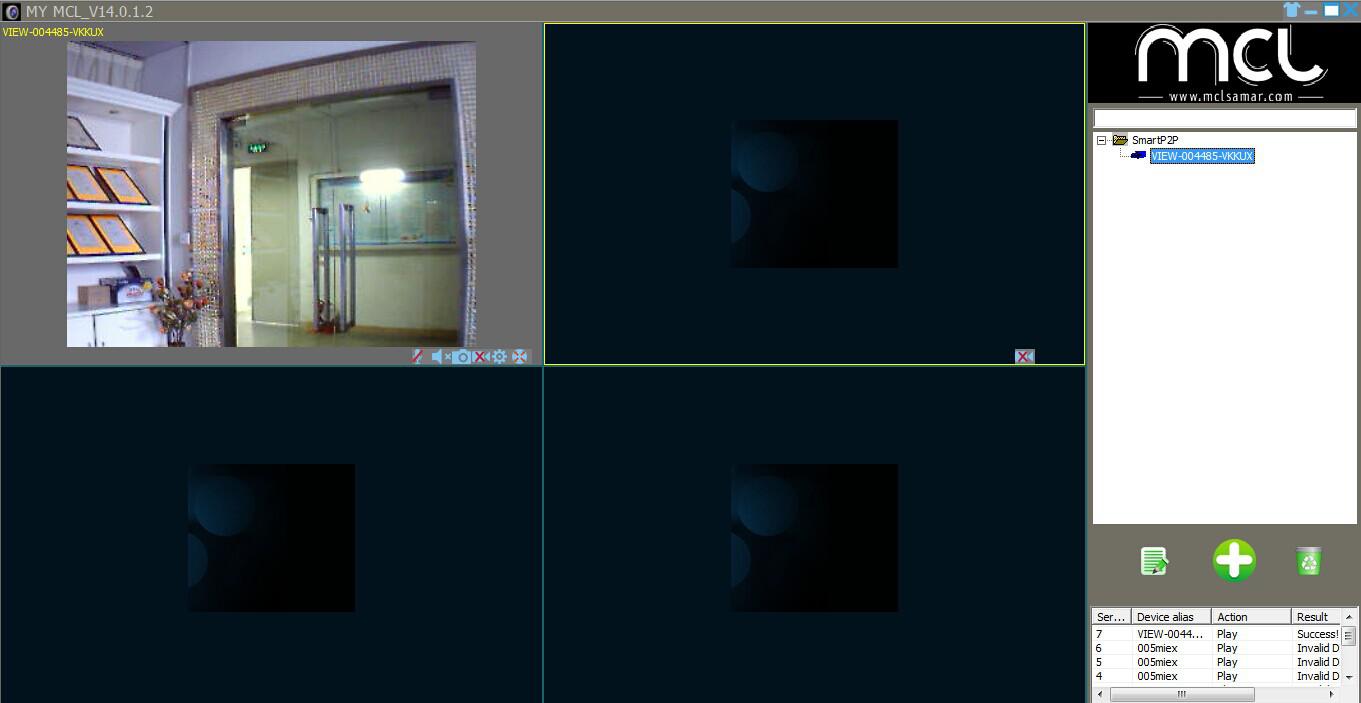
Step3: click “search”, then it will show the cameras on line, input Account and Passwaord, click “save”,then it will show camera on the list, double click camera, view the video as below.
Q9:How to do Email Setting?
There are 2 manners setting email, you can do Mail Setting on web, also you can do it on Android /iOS.
Manner 1: email setting on web.
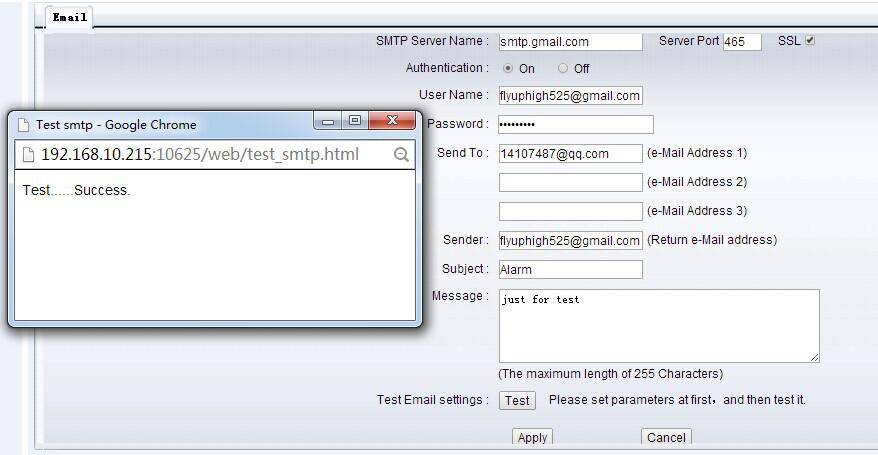
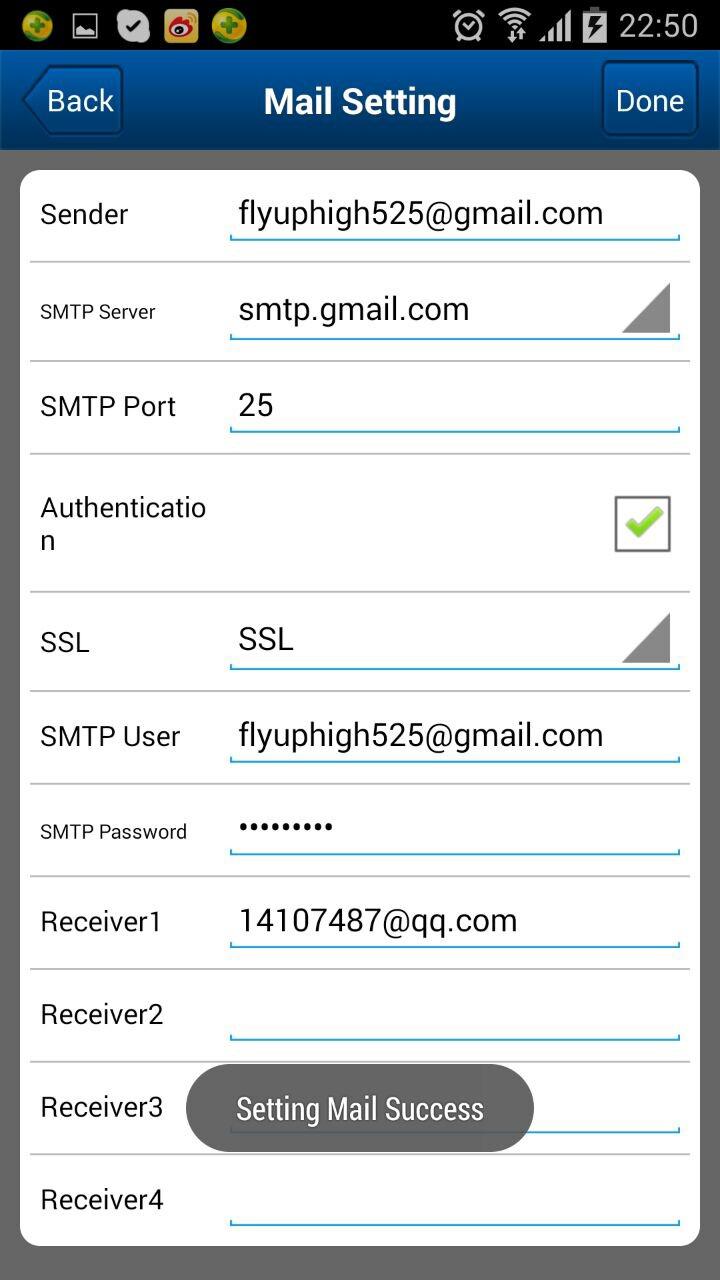
Answered: take gmail as example.
Step1:according to picture below, fill in required information, then click “Apply” botton to save it.
Step2: click “Test” button, if it shows ‘Test....success’, it means your setting is right, if it is failed to test, it means your setting is wrong, you can check SMTP server, server Port.
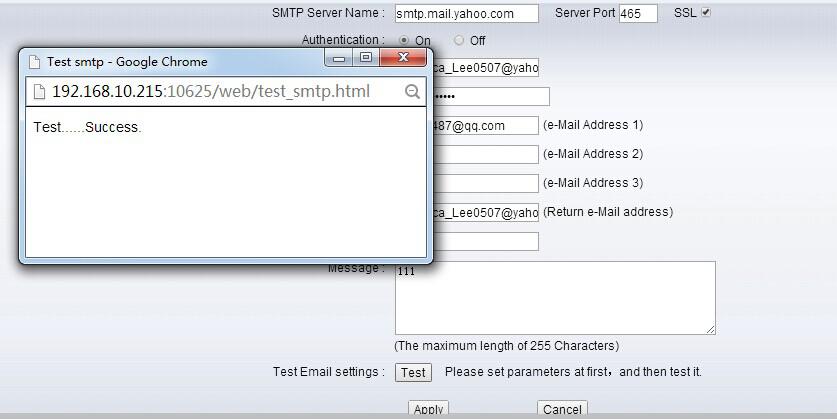
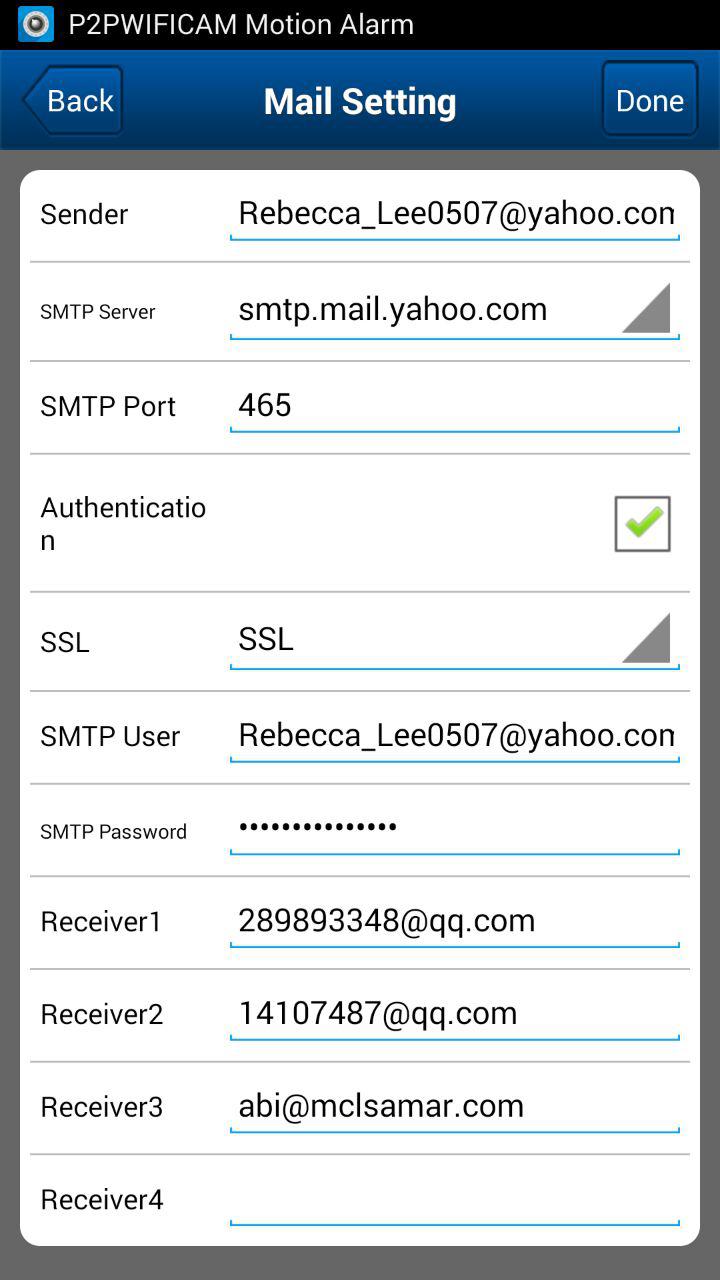
It is Yahoo mail setting example.
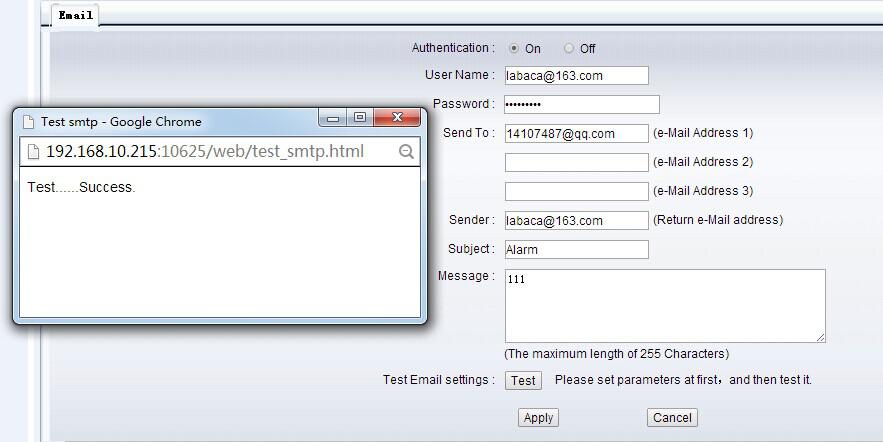
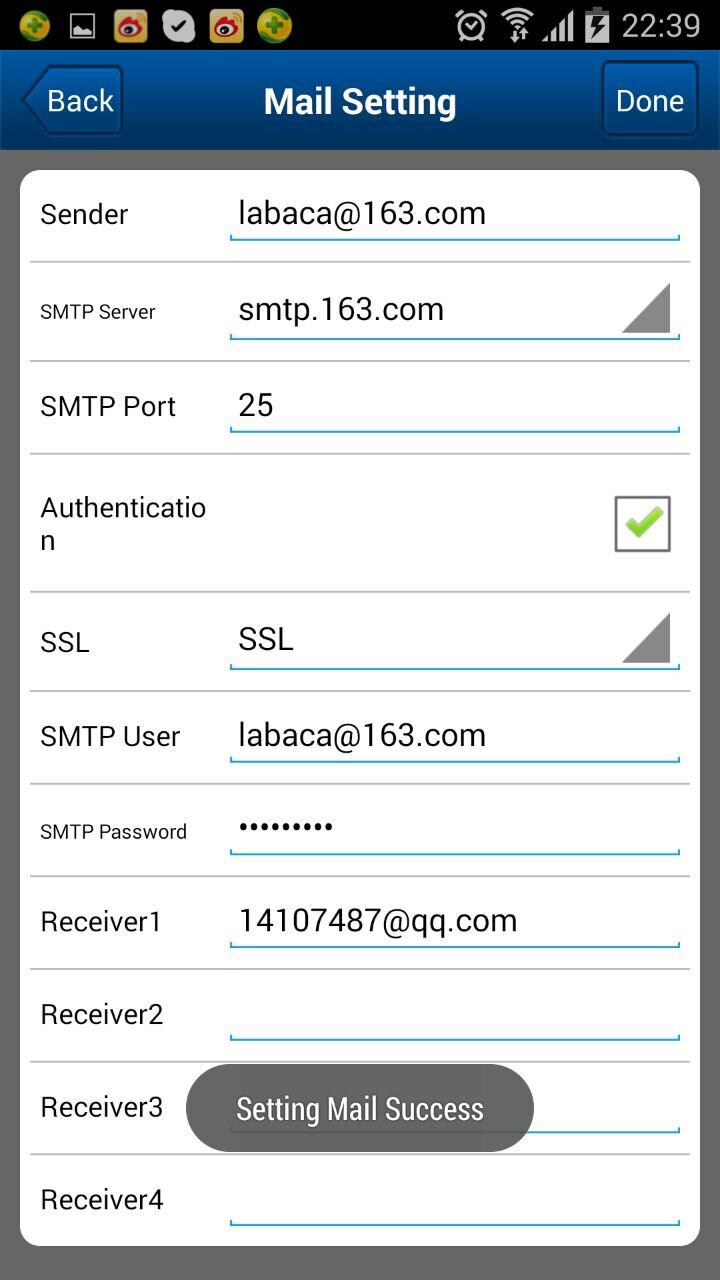
It is 163 mail setting example.
Manner 2: Email setting on Android /iOS
Take Yahoo, 163 and gmail as example, after you fnish setting, pls click “Done” button.
Q10: How to do ALARM Setting?
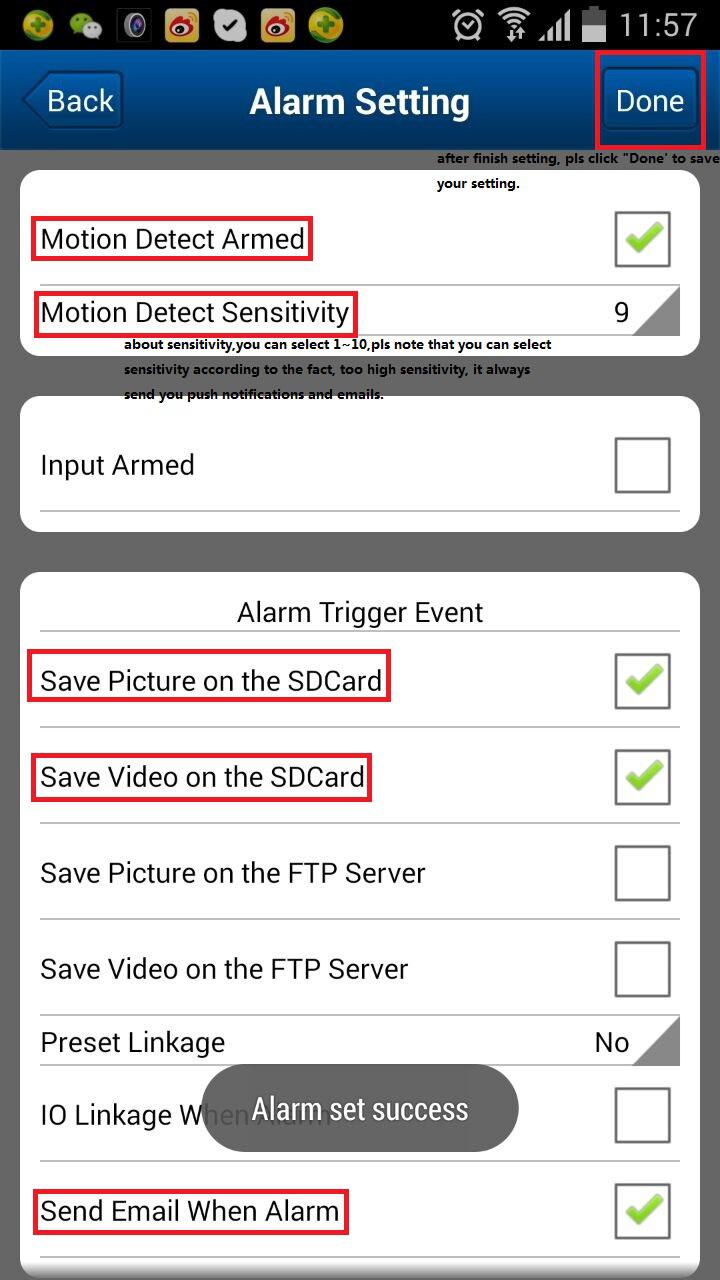
Answered: you can do Alarm setting on mobile, also you can do it on web.
Take Alarm Setting on Mobile as example.
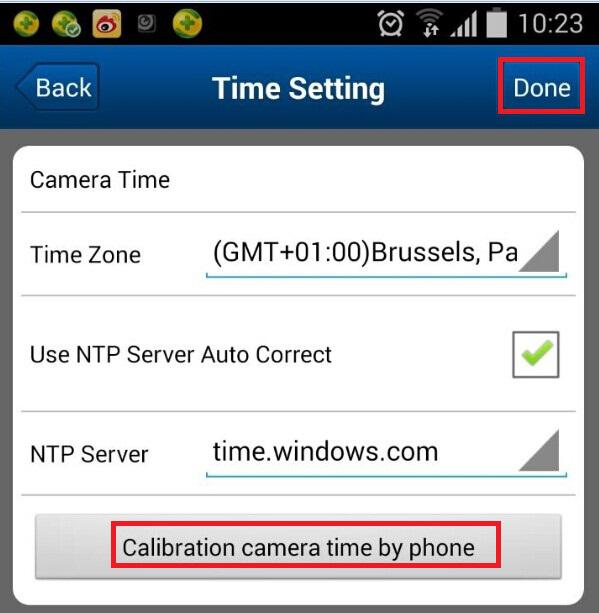
Q11:How to do Time Setting?
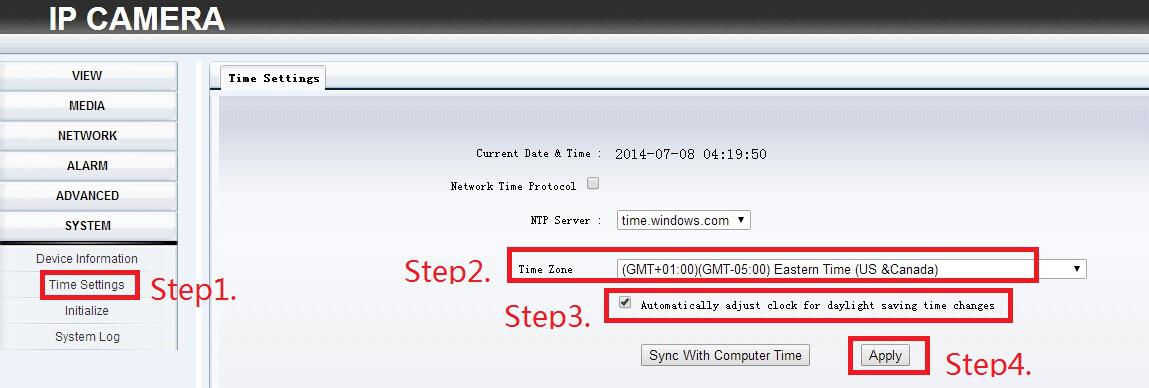
Answered: There are 2 manners to setting time. You can set time on Android/iOS, You also can do it on web.
Manner 1:
1)Enter into camera “advanced setting” →”Time Setting”
2)Select “time zone”
3)Tick “Use NTP Server Auto Correct”
4)If you want camera time keep same as your mobile, pls Click” Calibration camera time by phone”
Manner2:
Enter into web, do time setting as below 4 steps on picture. If there is daylight-saving time in your country ,pls tick it, then “ apply”.
Q12: how to do Motion detection setting?
Answered:
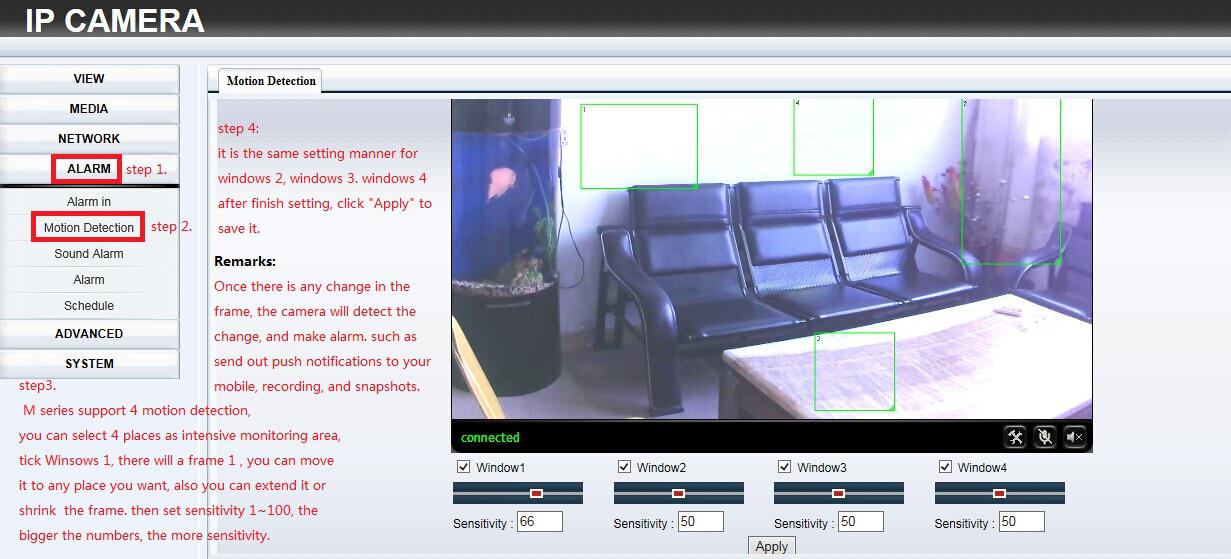
Step1: enter into camera web, click”Alarm
Step2: select “motion detection
Step 3: Take M series as example, M series support 4 areas motion detection, you can select places as intensive monitoring area. Tick window1, there will show a frame 1, you can move the frame to any place, and also you can extend the frame or shrink the frame, then select sensitivity 1~100, the bigger the numbers, the more the sensitivity.
Step 4: it is the same setting manner as Windows 2,3,4. After finish setting, click “Apply”.
Remarks:
Once there is any change in the frame, the camera will detect the change, and make alarm,such as send push notifications to your mobile, send pictures to your email, save video and pictures in SD card.
The picture is as below:
Q13:How to set Alarm in PC Client?
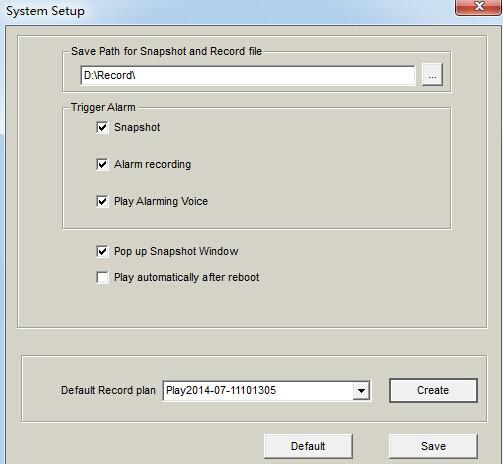
Answered: pls check the screenshot as above. Pls firstly select save path for snapshot and recording file,then Trigger Alarm, such as Snapshot, Alarm recording,Play Alarming Voice and so on. When there is alarm, It will auto make snapshot and recording and save these files into you pointed saving path. But pls make sure that only you set Motion Detection on web, the Alarm setted on PC can be active.
Q14: How to set Schedule Recording?
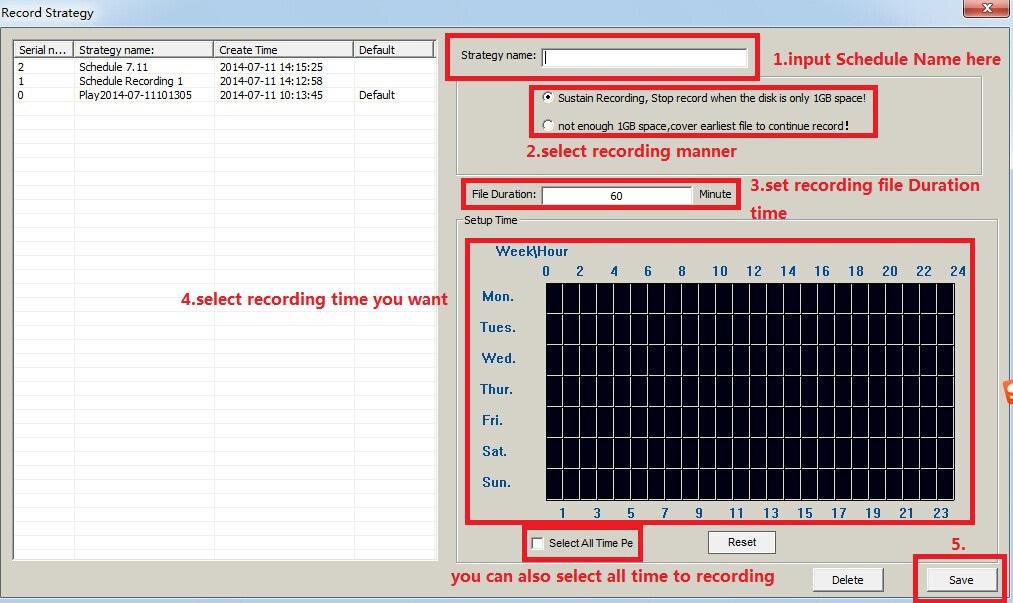
Answered: you can creat a Schedule Recording at first,click “Create” as below.
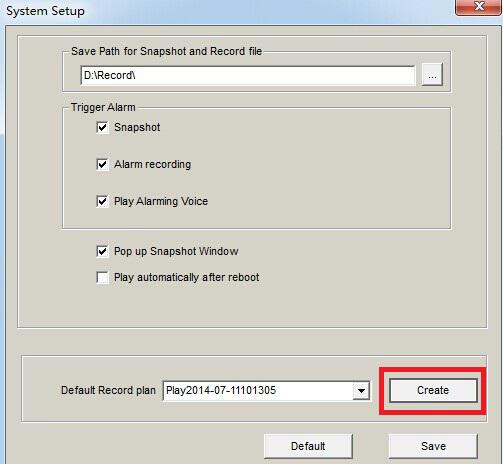
Then there will pup up a diagram frame as below, do it as below picture:
Q15:How to set Manual Recording?
Answered: check the below picture:
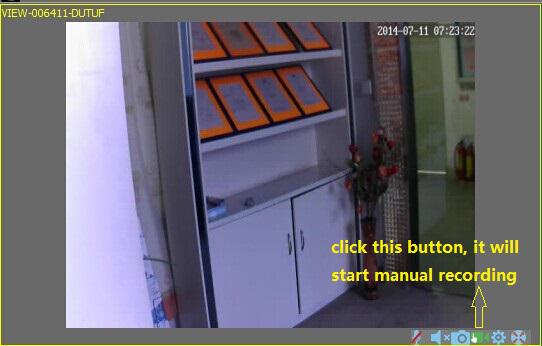
Q16: How to Playback the recording file?

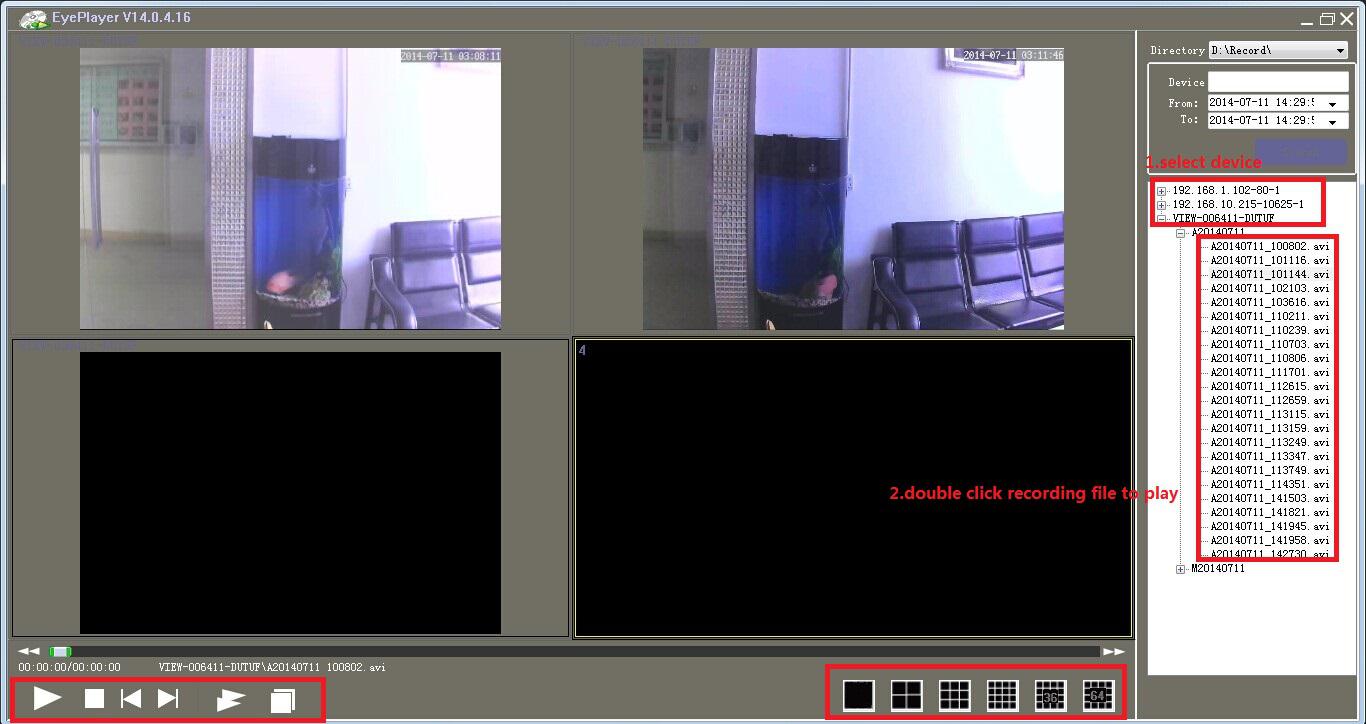
Answered: click Playback button, there will pop up a Eye Player.
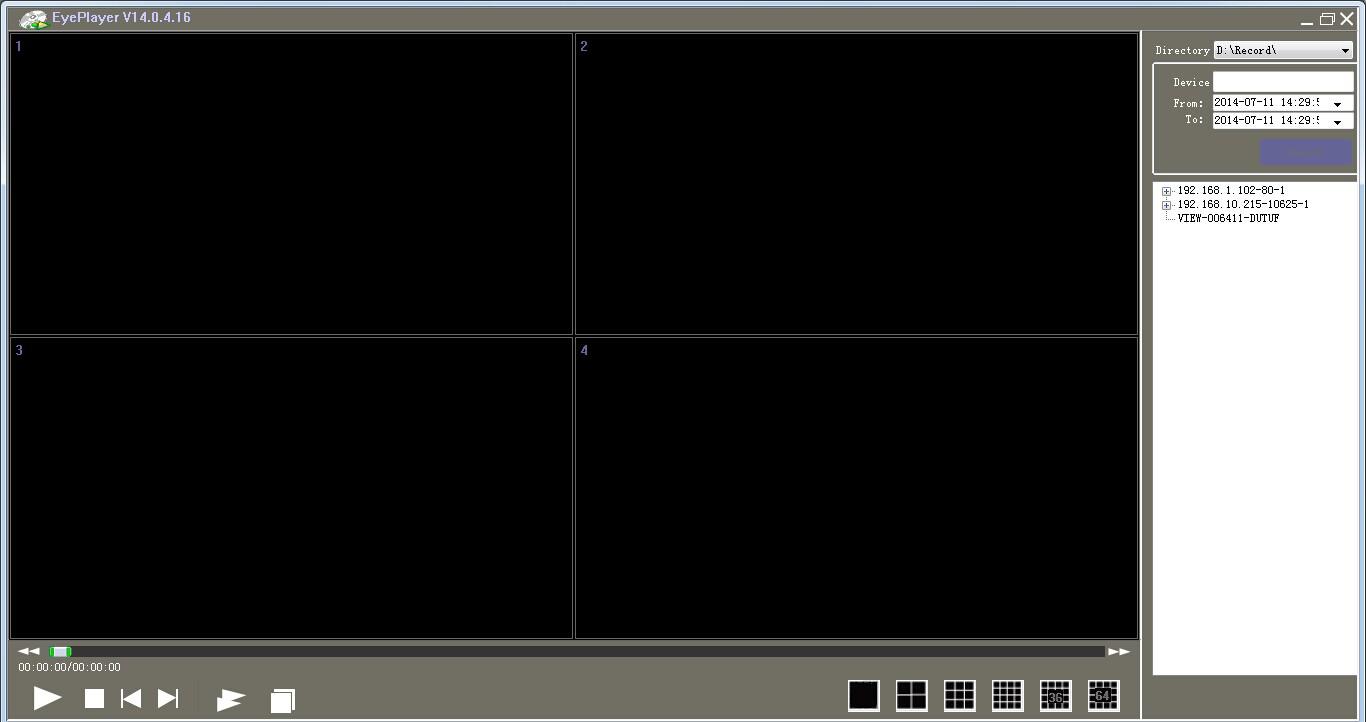
Step1: select the device you want
Step 2:Select recording file you want to check
